사용법
해당프록젝트폴더/Graphics/system/ 폴더안에
각각 해당되는 부분에 어떤 그림파일안에 추가시켜주면 됩니다.
((픽셀이 맞아야하니 그 점을 주의))
이부분은 어떤부분입니다. 라고 나와 있을겁니다(예: 이건 A4부분입니다.)
그려면 TIie해당부분.png에 그래픽프로그램으로 수정해 추가시키면됩니다.
------------맵칩에 관한 영문설명부분입니다--------------------------------
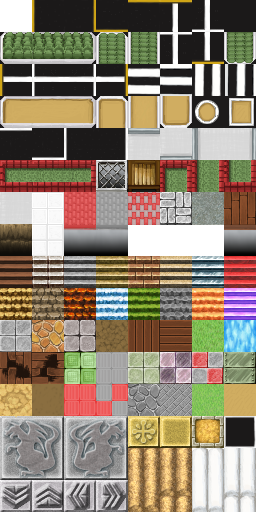
Tiles are 32×32 in size and divided into 5 sets from A through E, as explained below.
- Set A
-
This set is treated as the bottom layer when displaying the map. This set is divided into 5 parts, with most of the parts being "autotiles" -- special tiles that create borders automatically.
As a general rule, autotiles form the basis for the 6 tile patterns seen here.

- a
- Representative pattern (for displaying the tile set)
- b
- Patterns with borders at the corners
- c
- Group patterns (these form one group with the 8 along the outside and 1 in the center)
- Part 1 (TileA1.png)
-
This measures 512×384. As the figure below illustrates, it is made up of blocks of 5 patterns. As a general rule, combining tiles in in this part will not result in borders being created.
Only tiles in this part are passable by boats or ships. Airships can pass through them, but not land on them.

- Block A
-
Autotiles used as ocean tiles. The tiles will be animated if 3 of the basic autotile elements are placed next to one another horizontally.
- Block B
-
Autotiles used as deep ocean tiles. Tiles in this block are the only ones to create borders when placed next to other tiles from Part 1. Block A tiles are automatically displayed in the transparent parts of this block. As with Block A, the tiles will be animated if 3 of the basic autotile elements are placed next to one another horizontally.
Boats cannot pass through tiles from this block.
- Block C
-
Autotiles used to decorate the Block A ocean tiles. Block A tiles are automatically displayed in the transparent parts of this block.
Neither boats nor ships can pass through tiles from this block.
- Block D
-
Autotiles used for water. The tiles will be animated if 3 of the basic autotile elements are placed next to one another horizontally.
- Block E
-
Autotiles used for waterfall tiles. 2 horizontal tiles form a group pattern, and will be animated if 3 or more are placed next to one another vertically.
- Part 2 (TileA2.png)
-
This measures 512×384. As shown in the figure below, it consists of 4 rows of 3 block pattern

- Block A & Block B
-
Autotiles mainly used for general terrain. It can contain 3 patterns, with the pattern on the left being displayed in the transparent parts of the patterns in the center and on the right.
The center pattern has a "bush" attribute, which causes it to be displayed translucently over the bottom 8 dots of the character graphic. However, in Block A (woods tiles), the following 8 types, including the bottom right and bottom left corners will not be displayed translucently. In addition, characters whose file names start with a "!" will not be affected by the translucency effect.

Also note that airships cannot land on the center and right-hand tiles.
- Block C
-
Autotiles that do not form borders with other tiles.
- Block D

Autotiles that do not form borders with other tiles. These are mainly used as autotiles that represent tables. When placed, the 8 dots at the bottom of the pattern will be moved downward.
These tiles have a "counter" attribute. If placed between these tiles, a map event triggered by the confirm button can be activated, even it is not directly next to the other tiles.
- Part 3 (TileA3.png)
-
Autotiles that are primarily used for displaying the outsides of buildings. It measures 512×256 and consists entirely of autotile patterns (8 horizontal and 4 vertical).
When 2 or more tiles from this part are placed together vertically, the tile on the right will automatically have a shadow generated for it. The only tiles that have automatically generated shadows are those in Part 2 (not including Block C) and Part 5 (not including lines 1 and 2).
- Part 4 (TileA4.png)
-
Autotiles that are primarily used for walls. These are also used for dungeon generation. It measures 512×480. It consists entirely of basic autotile elements and group patterns (8 horizontal and 3 vertical).
When 2 or more tiles from this part are placed together vertically, the tile on the right will automatically have a shadow generated for it. The only tiles that have automatically generated shadows are those in Part 2 (not including Block C) and Part 5 (not including lines 1 and 2).
- Part 5 (TileA5.png)
-
This measures 256×512. Please put 8×16 tiles in this file. The tiles in this file will all be treated as normal tiles. The third, fifth, and seventh tiles are used for floors in dungeon generation.
- Set B - Set E (TileB.png / TileC.png / TileD.png / TileE.png)
-
These sets are treated as the top layer during map display.
Each measures 512×512. Please put 16×16 tiles in each file.
- The topmost tile in Set B represents the top layer with nothing in it, so it must always be left blank.
- Set E is for user-added tiles, so it is empty by default.